Learn How to Draw Hair With Step by Step Instructions
Table Of Content

I also put in some irregularities around the edges to match the surface (B). • Hair does not form a compacted shape, nor a consistent one. It is very light, so when the character moves, the wind, the humidity, or anything that surrounds it can affect its silhouette. • The volume varies depending on the amount of hair on each side of the head (3). Hair locks must somehow wrap the head following the curves of its surface. Both circles have a layer around them, but A looks more like a flat shape, whereas B looks to be more spherical.
Step 6
Artists Network is with you every step of your art journey. Each hair comes from a specific point and grows in a different direction. Even when the hair is very long, the gravitational force eventually brings it down. The shaft is the visible part of the hair, while the root is the part embedded in the skin. The follicle is the structure that surrounds the root and nourishes the hair.
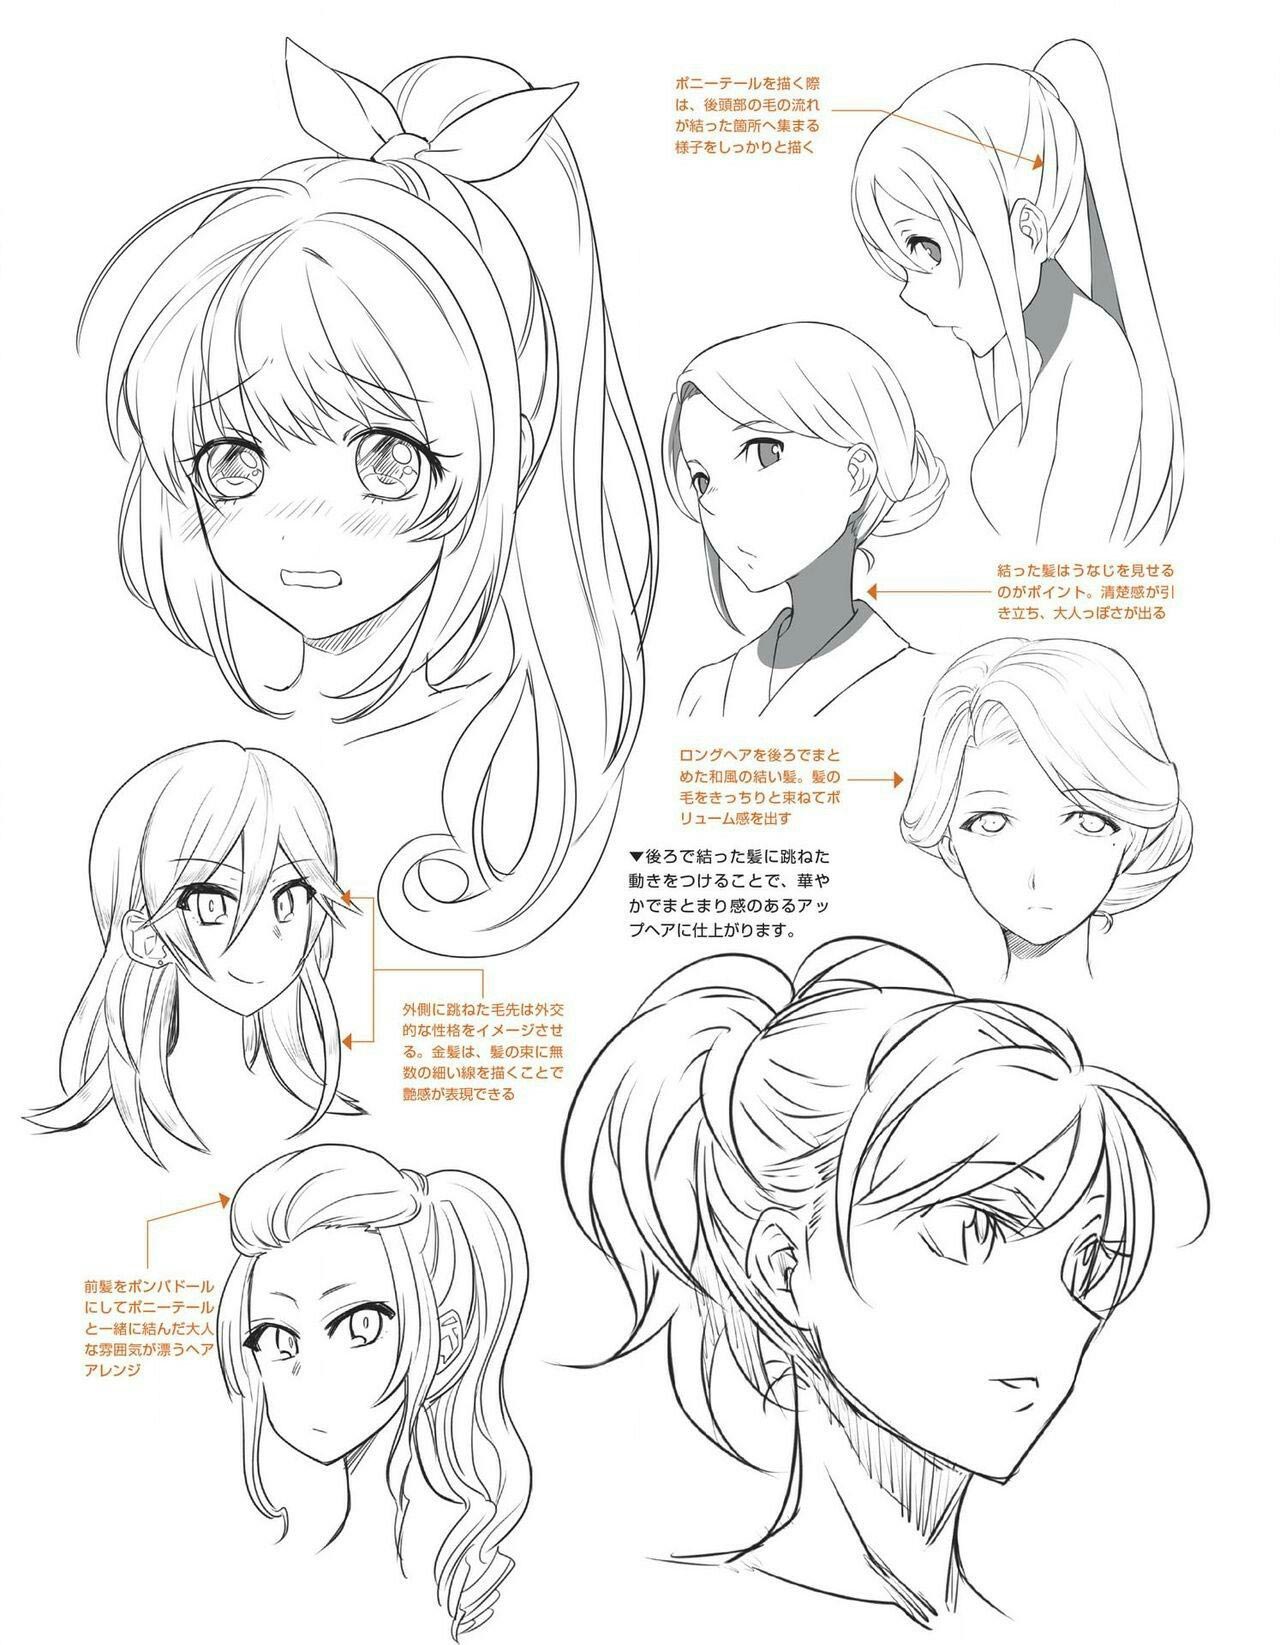
How to draw and color anime hair
This will help you identify areas for improvement and gain new perspectives on your hair drawing techniques. To complete your hair drawing, step back and evaluate the overall composition. Make any necessary adjustments to ensure balance and harmony with the rest of your artwork. Understanding these elements will help you create more accurate and realistic hair in your drawings.
Drawing Realistic Long Hair
Pretty much, what you want to avoid, is the spaghetti hair effect. You don't want your hair drawing to look like you're just putting down a bunch of lines from the top of the head. Add more layers of strokes over top of the first one to smooth out the gradients and darken the overall shading. Again be sure to leave some distance between the strokes to give an effect of individual hairs. Over top of the drawing of the head and hairline outline the main shape/shapes of the hair.
Step Three: Draw long locks of hair
At last, it is time to go over the illustration in ink. Pick out a fine-tipped pen and trace all of the graphite lines. Once you're sure the ink has dried, erase any visible pencil marks. The more you add, the denser the hairstyle will look. This will give the hair some detail and add depth to the whole haircut. Don't press too hard, and don't make the lines too tight.
How to Draw a Skateboard – Step by Step Guide
When drawing very short hair, take the skin tone up into the hair area. Next, add Light Umber to the hair, and then deepen the dark areas with Dark Umber. Use a very sharp pencil point and long, quick pencil strokes to create the appearance of hair strands. By viewing them up close, you can see how critical the pencil strokes are to creating texture. And, as noted previously, drawing hair correctly is a big part of being able to draw more realistic people.
Step 10
The examples in this tutorial can give you a good basic idea of how to draw some common hair types. If you want to try drawing another hairstyle you can still apply the same steps/principals used in these tutorial. First defining the main shape of the hair and then refine your drawing by adding the smaller details. Afterwards you can gradually shade the line drawing in several lairs of strokes. Below are a few segment drawings that show different types of hairstyles and textures. Doing small studies such as these can give you good practice with various techniques.
Short, Curly Hair
This shows the band of light, where the hair creates a tubular shape. This occurs when long hair follows a curve, and the protruding areas gather light. You will see this band in curls where the hair bends as well. The texture and color are dependent on the type of pencil stroke used and the pressure applied.
There are many different types of hairstyles and textures. These quick exercises below will give you some practice with some of the most common styles. The pencil lines create the texture of the hair, following the direction the hair is going. The highlights are lifted with the same type of quick stroke. You can tell this is dark hair by the depth of the tones. If you’re a beginner, this may seem like a daunting challenge, especially since this task can take longer than any other part of a drawing.
Don't press too hard—hair is soft and shouldn't have a hard outline. Hair is very difficult to draw, because what we see is different than what we know. You can't simply draw all the hairs in the form of lines, because that's not what we see when we look at hair.
New York Women Draw Their Own Pubes - The Cut
New York Women Draw Their Own Pubes.
Posted: Thu, 15 Nov 2018 08:00:00 GMT [source]
Look for photographs, art books, magazines, or even online resources that feature a diverse range of hair styles. Over time, your imagination and observation skills will work together to create unique and captivating hair designs. Consider the light source and create highlights and shadows accordingly. This will make your hair look more three-dimensional and lifelike. Add strands of hair in the form of little springs all around the head.
You could choose any colors that you love to finish up, and you have so many options at your disposal. So click on the “If You’re New, Start Here” page below and get started. However, this does depend on the style you're after. A good rule of thumb is, "less is more." If you can get away with one highlight, you're good. If you find you need even more, you're in danger of over doing it.
What we see must be simplified to lines and shades, and there are many ways to do it. Drawing realistic hair can be quite a challenge, so you should be very proud of reaching the end of the guide. Finally, be sure to go over all the final lines with a pen and then erase all leftover pencil lines. Then, carefully erase any part of the head outline that would be hidden by hair. 19 year industry professional animator and storyboard artist Luis Escobar will teach you what you need to know as if you’re where learning Kung Fu. If you’re embarrassed because you can’t draw a straight line or even a good stick figure.
Refine the shading by creating smoother gradients between the mid tone, light and “in shadow” areas of the hair. You can also make the shadow areas slightly darker. Use a kneaded eraser to lift the bands of light out of each curl.
To begin, lightly draw the shapes of the hair with a mechanical pencil. Then, go over it with some Dark Umber to separate the layers of the hair. Start your drawing by laying in the overall shape of the hairstyle with a pencil. Explosive —but not too much, curly hair is voluminous, hard to control and, many times, hard to comb! Fluffy, soft, playful and gorgeous, those are some adjectives we can think about for curly hair.


Comments
Post a Comment